Canopy API GraphQL Search: Quick Start Guide
Step-by-step guide to using Canopy API's GraphQL endpoint to search Amazon products, set up auth, write queries, and handle results.

Canopy API GraphQL Search: Quick Start Guide
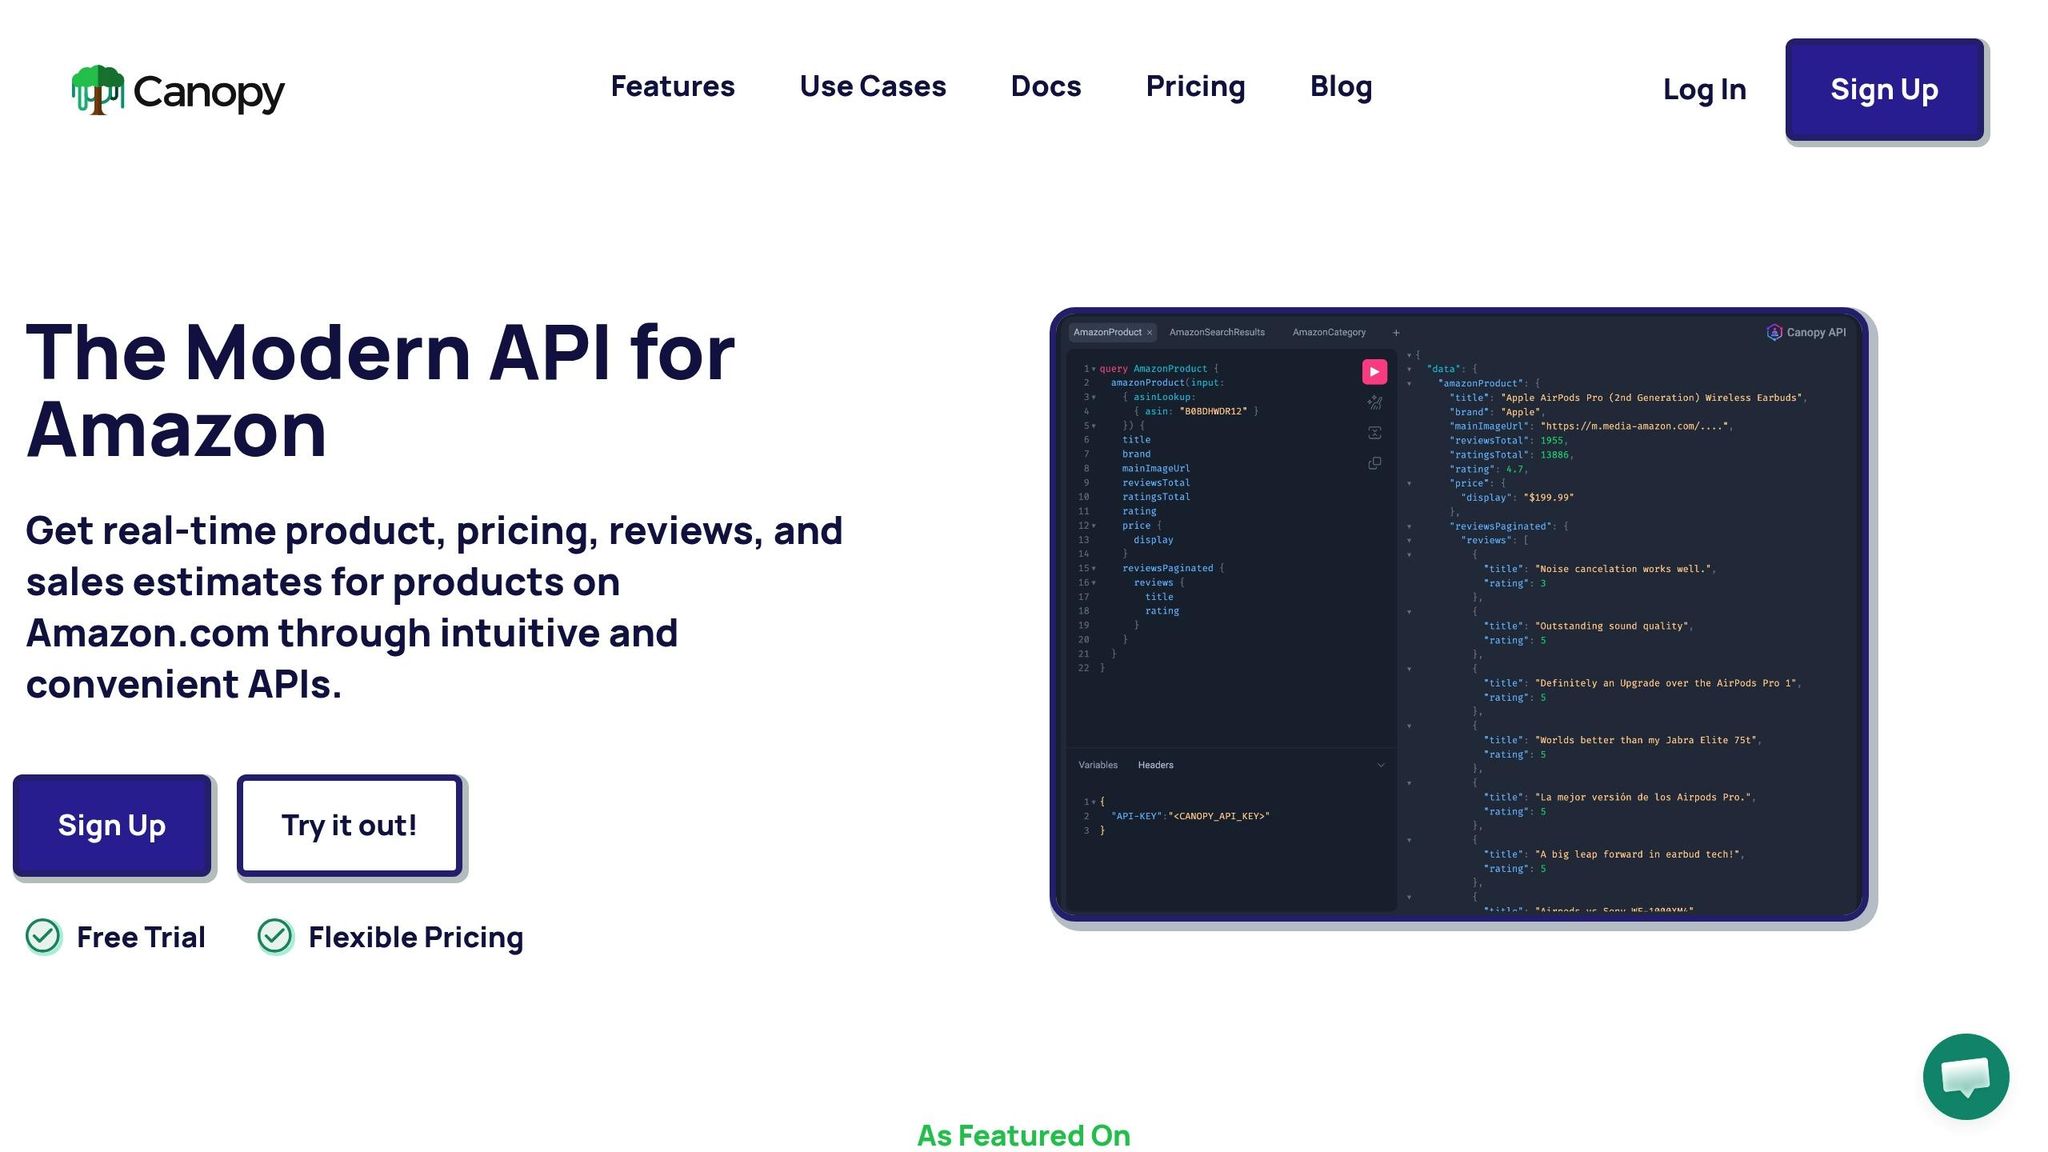
Looking for an easy way to access Amazon product data? The Canopy API’s GraphQL endpoint lets you retrieve real-time data for over 350 million Amazon products across 25,000+ categories. Forget maintaining your own scrapers - this API does the heavy lifting, so you can focus on what matters.
Here’s what you’ll learn:
- How to set up your Canopy API account and get your API key.
- Writing GraphQL queries to search for Amazon products by keyword and explore Amazon Search API use cases.
- Using JavaScript to integrate product search into your app.
The Hobby tier is free and offers 100 requests per month, while paid plans start at $0.01 per request. To get started, install Node.js and tools like GraphQL Playground or Hoppscotch for testing your queries. With just a few lines of code, you can fetch product details like title, price, rating, and images. Keep your API key secure by making requests server-side.
Why GraphQL? It allows you to request only the data you need, saving bandwidth and improving performance. Ready to build your product search? Let’s dive in.
Setting Up Your Canopy API Account
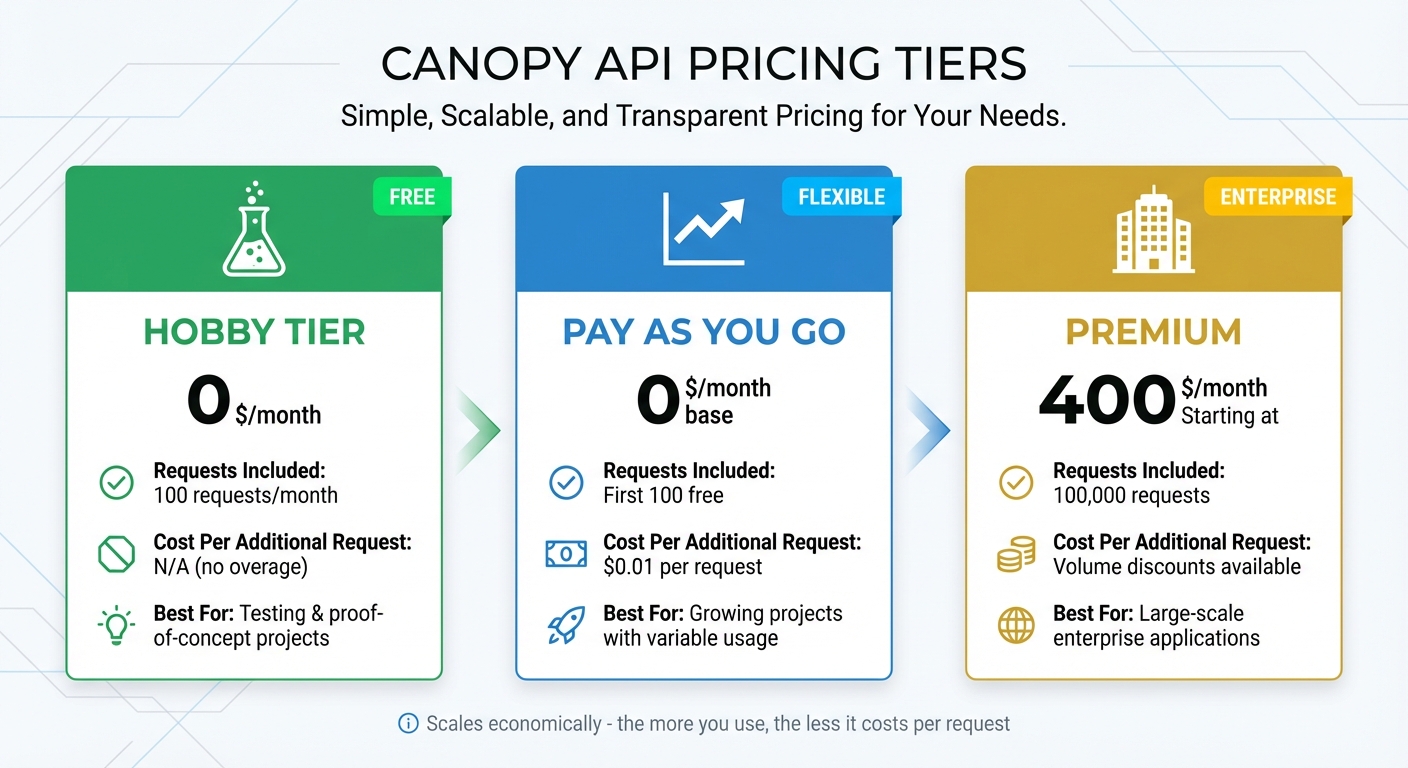
Canopy API Pricing Tiers Comparison: Hobby vs Pay As You Go vs Premium Plans
Creating Your Account and Getting an API Key
To get started, head over to the Canopy API website and sign up. Once logged in, you’ll find your API key on the dashboard. Copy it and store it somewhere safe - you’ll need it to make requests later.
The Hobby tier is a great starting point, offering 100 free requests per month. It’s ideal for testing or building small proof-of-concept projects. If you need more capacity, you can upgrade to the Pay As You Go plan, which costs $0.01 per request after the first 100. For larger-scale needs, the Premium plan starts at $400 per month and includes 100,000 requests.
What You Need Before Starting
Before diving in, make sure you’ve installed Node.js and npm. These are essential for running the JavaScript examples provided in this guide.
For testing your queries, tools like GraphQL Playground, Hoppscotch, CodeSandbox, or Replit can be incredibly helpful. These platforms allow you to verify your API key and query structure without needing to set up a full development environment. They’re perfect for quick experiments and troubleshooting.
Once your tools are ready, you can move on to authenticating your API requests.
How to Authenticate Your Requests
To interact with the GraphQL endpoint at https://graphql.canopyapi.co/, you’ll need to include your API key with every request. Here’s how to do it:
- Use the
API-KEYheader with your key as the value for basic implementations. - Alternatively, use the
Authorizationheader in the formatBearer YOUR_API_KEYfor more advanced setups like GraphQL Yoga, Apollo Server, or Next.js integrations.
| Header Name | Value Format | When to Use |
|---|---|---|
API-KEY |
YOUR_API_KEY |
Simple fetch requests or basic setups |
Authorization |
Bearer YOUR_API_KEY |
Advanced frameworks (e.g., Apollo, Next.js) |
Content-Type |
application/json |
Required for all GraphQL POST requests |
Important: Never embed your API key directly in client-side code when deploying to production. Instead, make API calls from your server or backend to keep your credentials secure. While browser-based tools are fine for initial testing, always transition to a server-side setup before going live.
sbb-itb-d082ab0
Creating Keyword-Based Product Search Queries
Once your account is set up and authenticated, you’re ready to dive into building keyword-based search queries.
Basic Query Structure
After authentication, the next step is constructing your search queries. Canopy API GraphQL queries follow a straightforward format. To get started, you’ll send a POST request to https://graphql.canopyapi.co/ with a JSON payload containing your query string. Each query includes three main components: an operation name, an input object for search parameters, and a set of fields you want in the response.
Here’s an example query:
const query = `
  query SearchProducts {
    searchProducts(input: { keyword: "wireless headphones" }) {
      title
      brand
      price {
        display
      }
      rating
      ratingsTotal
      mainImageUrl
    }
  }
`;

const response = await fetch('https://graphql.canopyapi.co/', {
  method: 'POST',
  headers: {
    'Content-Type': 'application/json',
    'API-KEY': 'YOUR_API_KEY'
  },
  body: JSON.stringify({ query })
});

const data = await response.json();
When querying pricing information, always include the display sub-field inside the price object. Omitting it can lead to errors, so make sure this detail is part of your query to ensure proper price formatting.
Once you’ve mastered this basic structure, you can move on to adding variables for more flexible and dynamic queries.
Adding Variables to Your Queries
Hardcoding values in your queries can make them rigid and harder to reuse. Instead, variables allow you to keep your queries cleaner and more adaptable. By defining placeholders (e.g., $keyword: String!) in the query, you can pass actual values separately via a variables object.
Here’s how it works:
const query = `
  query SearchProducts($keyword: String!, $country: String) {
    searchProducts(input: { keyword: $keyword, country: $country }) {
      title
      brand
      price {
        display
      }
      rating
      ratingsTotal
    }
  }
`;

const variables = {
  keyword: "bluetooth speakers",
  country: "US"
};

const response = await fetch('https://graphql.canopyapi.co/', {
  method: 'POST',
  headers: {
    'Content-Type': 'application/json',
    'API-KEY': 'YOUR_API_KEY'
  },
  body: JSON.stringify({ query, variables })
});
This approach lets you dynamically adjust search terms, target specific Amazon marketplaces with country codes, and implement pagination for browsing large result sets. Using variables ensures your queries remain efficient and tailored to specific needs.
Understanding Response Fields
The API delivers data in JSON format, reflecting the fields you requested. To build an effective product search interface, focus on fields that provide the most value to your users.
| Field Name | What It Returns | Why It Matters |
|---|---|---|
title |
Full product name | Crucial for identifying products |
brand |
Manufacturer name | Helps users filter by brands |
price { display } |
Formatted price (e.g., "$25.00") | Shows current pricing in USD |
rating |
Average star score | Indicates product quality |
ratingsTotal |
Total review count | Adds context to ratings |
mainImageUrl |
Primary product image URL | Enhances visual appeal |
When using the rating field, always pair it with ratingsTotal for better context. For instance, a 5-star rating based on just three reviews doesn’t carry the same weight as a 4.5-star rating backed by 1,250 reviews. Additionally, requesting only the fields you need helps optimize GraphQL queries for speed by minimizing response payload size, aligning with earlier optimization strategies.
JavaScript Implementation Guide
Here’s how to bring the query structure and response fields together into a functional JavaScript implementation. This guide walks you through the steps, from setting up your environment to handling and formatting API responses.
Installing Required Libraries
Start by initializing a new Node.js project and installing the necessary libraries:
npm install graphql graphql-request
For modern browsers, you can use the native fetch API. If you're working in a Node.js environment, you’ll need to install node-fetch. The graphql-request library is particularly helpful for managing more complex queries with cleaner syntax.
Security Tip: Never expose your API key on the client side. Always use a backend or environment variables in production to keep sensitive information secure.
Example Code for Keyword Search
Here’s an example of how to perform a keyword search for laptops using the native fetch API:
const query = `
  query SearchProducts($keyword: String!) {
    searchProducts(input: { keyword: $keyword }) {
      title
      brand
      mainImageUrl
      rating
      ratingsTotal
      price {
        display
      }
    }
  }
`;

const variables = {
  keyword: "laptop"
};

async function searchProducts() {
  const response = await fetch('https://graphql.canopyapi.co/', {
    method: 'POST',
    headers: {
      'Content-Type': 'application/json',
      'API-KEY': 'YOUR_API_KEY'
    },
    body: JSON.stringify({ query, variables })
  });

  const data = await response.json();
  return data;
}

searchProducts()
  .then(result => console.log(result.data.searchProducts))
  .catch(error => console.error('Search failed:', error));
This script sends a POST request to the Canopy API's GraphQL endpoint, including the query and variables in the request body. The response contains rankings and product details for the specified keyword. The Canopy API provides access to data from over 350 million Amazon products across more than 25,000 categories.
Handling and Formatting Results
The API response is in JSON format, structured according to the fields you included in your query. After calling response.json(), the product data is accessible through data.data.searchProducts.
For example, the price { display } field provides pre-formatted USD prices like "$1,299.00". To display the products, you can loop through the results and render fields such as title, mainImageUrl, and price.display in your user interface.
When implementing this in your app, make sure to include loading states while waiting for the fetch promise to resolve. For more advanced functionality, such as creating interactive dashboards, consider using visualization tools like Chart.js to bring your data to life.
Tips for Optimizing Your Searches
Using Filters to Narrow Results
GraphQL queries give you the ability to fine-tune your searches by defining parameters and filters within an input object. This means you can focus your search on specific criteria like category, price, brand, or rating. By doing this, you avoid pulling in unnecessary data, keeping responses efficient and helping you stay within API usage limits. For instance, if you're looking for laptops priced under $1,000.00 with a minimum 4-star rating, you can set these requirements directly in your query variables to filter out irrelevant products.
Using filters not only saves you time but also ensures you're working with the most relevant data while managing your resource usage effectively.
Tracking Your API Usage
Keeping tabs on your API usage is crucial, especially if you're on the Hobby or Pay As You Go plans. The Hobby plan allows only 100 requests per month, so implementing internal logging to track your API calls can prevent you from hitting your limit unexpectedly.
Stefan, Founder of Automateed, explains, "the free tier caps at just 100 requests per month, which could be limiting for larger businesses".
If you're using the Pay As You Go plan, remember that each request beyond the first 100 free ones costs $0.01. Without monitoring, these costs can add up quickly. For businesses with higher usage, upgrading to a Premium plan - starting at $400 per month - might be more cost-effective. Stefan also highlights the scalability of the service:
"Canopy API scales economically - the more you use it, the less it costs per request".
By staying on top of your API usage and understanding your needs, you can avoid unexpected expenses and ensure smooth operations.
Using AI-Powered Data Fields
Once you've optimized your queries, you can take things further by tapping into AI-powered features. Canopy API integrates with Model Context Protocol (MCP) servers, enabling AI tools like ChatGPT to access real-time Amazon product data for a variety of automated workflows. These AI-driven fields can help you analyze review sentiment, create personalized product feeds, or automate tasks such as compliance checks and competitor analysis.
With access to data from over 350 million products, the possibilities are vast. For example, you can use the Canopy MCP Server to generate automatic "pros and cons" lists from product reviews, delivering quick and concise summaries. If you're just starting out, the free tier is a great option for prototyping AI-powered tools like price drop detectors or sentiment analyzers before committing to a larger plan.
Conclusion
Summary
This guide walked you through setting up and using Canopy API's GraphQL endpoint for keyword-based product searches. With access to Amazon's extensive product database spanning over 25,000 categories, Canopy API enables you to retrieve only the data you need - like asin, price, rating, and mainImageUrl. This targeted approach ensures your integrations remain efficient and cost-effective.
The API is designed for speed and simplicity, allowing you to start fetching Amazon data within minutes using standard POST requests and API‑KEY authentication. Whether you're building tools like price trackers, conducting data analysis, or powering AI-driven product feeds, the service is built to scale with your needs.
By combining the flexibility of GraphQL, real-time search rankings, and straightforward pricing, Canopy API provides a reliable solution for developers. It allows you to focus on creating and refining your product without worrying about maintaining scrapers or dealing with data inconsistencies.
What to Do Next
Take advantage of GraphQL’s ability to fetch only the data you need, making your integrations lean and scalable. Test your queries using tools like GraphQL Playground or Hoppscotch to ensure they deliver the results you’re looking for.
Once you’re comfortable with basic keyword searches, consider exploring advanced features. For example, the OffersV2 endpoint provides deeper pricing insights, while the MCP Server supports AI-driven workflows to enhance your application further.
For more detailed guidance, check out the official documentation for schema details, advanced queries, and resolver information. You can also explore the GitHub repository for open-source examples, or visit the blog for JavaScript code samples and insights into sales trends and category data. Lastly, ensure your API‑KEY is secured server-side, and monitor your usage to optimize costs as you scale your project.
FAQs
How do I keep my Canopy API key secure?
To keep your Canopy API key safe, think of it as you would a password. Don't share it publicly or store it in places that aren't secure. Instead of hardcoding it into scripts or applications, use environment variables or secrets for storage. If you're working with multiple keys, be cautious when switching between sandbox and production keys, and make sure that only trusted, authorized individuals have access to your credentials.
How do I add pagination to searchProducts?
To paginate the searchProducts query in Canopy API's GraphQL, you’ll need to use cursor-based pagination. Start by adding the first argument to determine how many results you want per page (e.g., first: 20). Then, include the after argument with the cursor value from the previous page's response.
In the response, look for the pageInfo field. This will tell you two important things: whether there are more pages (hasNextPage) and the cursor for the next page (endCursor). Use the endCursor in your next query to fetch the subsequent set of results.
Why does price.display sometimes error out?
The price.display function might encounter errors due to several factors like over-fetching data, poorly optimized query structures, or surpassing rate limits. These problems can interfere with obtaining accurate pricing information. To prevent such issues, focus on optimizing your queries and ensuring they adhere to the set rate limits.